Met de komst van Testcontainers is het mogelijk om externe services te starten op lokale Docker containers. Door een consistente testomgeving te bieden, verkleint Testcontainers de kans op ‘werkt op mijn machine’-problemen, wat zorgt voor betrouwbaardere en reproduceerbare testresultaten. Testcontainers kan eenvoudig worden geïntegreerd met populaire testframeworks zoals JUnit.
Door gebruik te maken van Docker-containers kunnen complexe services zoals databases, web-servers of zelfs hele applicaties worden opgestart zonder ingewikkelde installatieprocessen of configuraties op de lokale machine of in de CI/CD-pijplijn.
Een simpel java voorbeeld
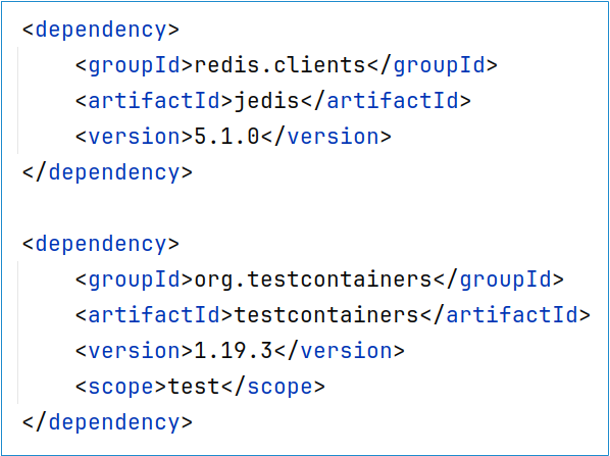
Laten we eens kijken naar een simpel java voorbeeld met een dependency op Redis. We gebruiken hiervoor Jedis als client.
Allereerst importeren we de benodigde maven dependencies:
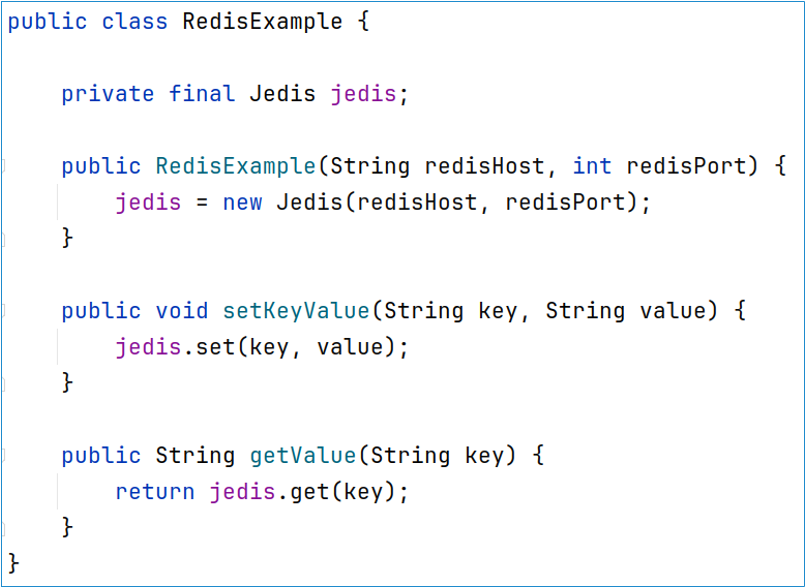
Daarna maken we een simpele class aan met daarin een dependency op de Redis service:
Hier gebeuren een aantal interessante dingen. In de try-with-resources wordt de container gedefinieerd. Met de .withExposedPorts() methode geven we de port binnen de container op. Testcontainers zal deze port mappen naar een willekeurige port op de host machine.
Met .getHost() en .getMappedPort(6379) op het container object krijgen we de waarde van de host en de random port. Omdat we maar 1 port hebben ge-exposed kun je in plaats van .getMappedPort(6379) ook .getFirstMappedPort() gebruiken.
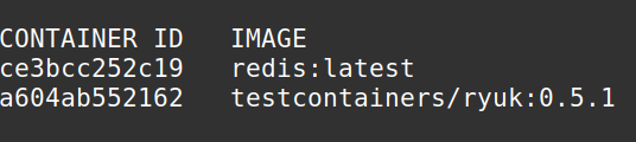
Kijken we naar de output van ‘docker ps’ dan zien we dat er 2 containers worden opgestart.
Ryuk als hulpprogramma
Kijken we naar de output van ‘docker ps’ dan zien we dat er 2 containers worden opgestart.
De eerste is zoals verwacht onze Redis container. Daarnaast start Testcontainers ook een ryuk container op.
Testcontainers gebruikt Ryuk als hulpprogramma om ervoor te zorgen dat alle containers die tijdens de tests worden gecreëerd, automatisch en op betrouwbare wijze worden gestopt en verwijderd wanneer de testrun voltooid is. Aangezien Ryuk onafhankelijk van de testprocessen draait, kan het opruimen zelfs doorgaan als het testproces onverwacht stopt of crasht.
Voordelen bij integratie testen
Het voorbeeld hierboven is bewust simpel gehouden om de leesbaarheid te vergroten en lijkt daardoor vooral op een unit test, maar Testcontainers komt pas echt tot zijn recht bij integratie testen.
Alle onderdelen van de integratietest inclusief externe services kunnen met Testcontainers lokaal worden gestart. Denk hierbij bijvoorbeeld aan het testen van een ETL-applicatie welke afhankelijk is van PostgreSQL, Kafka en Elasticsearch. Een ander voordeel is dat bij een aanstaande upgrade van een van deze drie services je snel en vooraf kunt testen of de applicatie goed met de upgrade overweg kan.
Conclusie
Testcontainers is een essentieel gereedschap voor moderne softwareontwikkeling, dat ontwikkelaars in staat stelt om sneller te werken. Of het nu gaat om het testen van kleine componenten of het valideren van de werking van een gehele applicatie in een geïntegreerde omgeving, Testcontainers verhoogt de efficiëntie en betrouwbaarheid van het testproces. Dit maakt het een onmisbare stuk gereedschap voor elke ontwikkelaar die streeft naar het leveren van hoogwaardige en betrouwbare software.
In this blog I suggest a possible implementation improvement for a feature that promised a brighter future for Java. ‘The Optional‘. Java has been known since its inception for the ever present NullPointerException and the Optional should have offered a cleaner way of dealing with missing values.
What Optional should have been
Since “new” java, starting with java 8, the java standard has been expanded to support more modern programming paradigms. Optional was an obvious improvement over the existing null check / NullPointerException state. However, after 9 years since Java 8 with the introduction of Optional, it is still not as widely used as in other languages.
Why is Optional not used more?
class testOptional{
    @Test
    void testNewOptional() {
        // Old style is still supported:
        Optional.of("ifPresent")
                .ifPresent(System.out::println);
        Optional.empty()
                .ifPresent((v) -> fail(format("Should not enter branch; value is '%s'", v)));
        Optional<String> stringOpt = present("ifPresentOrElse");
        if (stringOpt.isPresent()) {
            System.out.println(stringOpt.get());
        } else {
            fail("Should not enter branch");
        }
    }
}Using Optional is not as easy as it should be. The syntax is verbose and the API is not as intuitive as it could be.
This can be solved by record pattern matching:
class testOptional{ @Test void testNewOptional() { // New style with pattern matching switch (Optional.of("Hello")) { case Present(var value) -> assertEquals("Hello", value); case Empty() -> fail("Should not enter branch"); } if (Optional.of("test") instanceof Present(var value)) { assertEquals("test", value); } else { fail("Should not enter branch"); } } }
This pattern matching has been enabled by creating a sealed interface with two implementations:
public sealed interface Optional<T> /* implicit permits Optional.Empty, Optional.Present*/ {
    static <T> Optional<T> empty() {
        return new Empty<>();
    }
    static <T> Optional<T> present(T value) {
        return new Present<>(value);
    }
    record Empty<T>() implements Optional<T> {
    }
    record Present<T>(T value) implements Optional<T> {
    }

    /*
     * Throws NoSuchElementException if this is None
     */
    default T get() {
        return switch (this) {
            case Present(var some) -> some;
            case Empty() -> throw new NoSuchElementException("Cannot get value from None");
        };
    }
    // part of the api implemented
    /**
     * Unwrap the value, if present, otherwise return other.
     */
    default T orElse(T other) {
        return switch (this) {
            case Present(var some) -> some;
            case Empty() -> other;
        };
    }
    /**
     * Filters the optional value, if the predicate returns false.
     */
    default Optional<T> filter(java.util.function.Predicate<? super T> predicate) {
        return switch (this) {
            case Empty() -> this;
            case Present(var some) when predicate.test(some) -> this;
            case Present(var ignored) -> empty();
        };
    }
}
All methods are declared in this interface, either as static or default methods. To get more control over the access modifiers it might be better to use an abstract class rather than an interface. However, records cant extend any classes, so this is not possible.
The new syntax is more concise when unwrapping the value.
Implementing Result type
This Syntax could also be used to make other parts of java more functional. For example, the Result type. The Result type is a type that can hold either a value or an error. This is useful when you want to return a value, but also want to be able to return an error.
public sealed interface Result<T> /*implicit permits in same package*/ {
    static <R> Result<R> from(Callable<R> callable) {
        try {
            return new Ok<>(callable.call());
        } catch (Exception e) {
            return new Error<>(e);
        }
    }

    record Ok<R>(R value) implements Result<R> {
    }

    record Error<R, E extends Throwable>(E throwable) implements Result<R> {
    }
}
This can be used to return a value or an error:
class ResultTest { @Test void testResult() { Callable<String> callable = () -> "Hello"; switch (Result.from(callable)) { case Result.Ok(var value) -> assertEquals("Hello", value); case Result.Error(var throwable) -> fail("Should not enter branch", throwable); } } @Test void testThrowable() { Callable<String> throwingCallable = () -> {throw new RuntimeException("this should not actually fail");}; switch (Result.from(throwingCallable)) { case Result.Ok(var value) -> fail(format("Should not enter branch; value is '%s'", value)); case Result.Error(var throwable) -> assertEquals(throwable.getMessage(), "this should not actually fail"); } } }
Future improvements
In the future we will be able to use value classes to make Optional even better, now the Optional might still cause a double indirection to access the actual data. With value classes from project valhalla, all data of an object can be stored on the stack instead of the heap. This is perfect for Optional, since it is a wrapper around a value.
Conclusion
While this is a nice possibility, I don’t think Java should actually change the current implementation of Optional. This could break some backwards compatibility and would not be worth it.
In Werken bij Caesar Experts vragen we diverse mensen uit ons team naar hun werk. Vandaag is Cees van Leenen aan de beurt! Cees is in juni 2020 begonnen als Java developer bij Caesar Experts. Hij werkt nu bij zijn tweede klant en is daar in een team van zes man verantwoordelijk voor het bouwen van koppelingen van een grote database naar diverse systemen binnen de organisatie.
“Ieder systeem wil net een ander stukje informatie hebben, dat ik moet vertalen vanuit de database. Alhoewel het leggen van een koppeling heel makkelijk klinkt, komt er toch meer bij kijken dan in eerste instantie wordt gedacht. Veel koppelingen zijn nu nog gebouwd met behulp van XSLT en deze moeten gerefactored worden. Verder worden alle uitgaande berichten gevalideerd aan onze XSD. Er wordt bepaald welke gegevens we eruit halen en hoe we dit in een nieuw bericht wordt gezet, zodat het doorgestuurd kan worden.”
Cees werkt in zijn huidige project in Apache Camel, Java 8 en rabbitMQ. Verder krijgt hij veel te maken met REST services. Ook wordt er langzaam een overgang gemaakt naar Azure en Kubernetes. In die laatste techniek heeft hij zelf kort geleden een cursus afgerond, hier zou hij dan ook graag meer van willen leren en dit hoopt hij binnen zijn huidige project te kunnen doen.
“Wat ik erg leuk vind, is dat ik de gehele flow mag maken. Vaak werk je bij een klant aan een webapplicatie en ben je verantwoordelijk voor de frontend óf de backend. Bij mijn huidige klant ben ik verantwoordelijk voor de gehele koppeling, van voor naar achter. Dat maaktdit een leuke uitdaging.”
Omdat Cees verantwoordelijk is voor het geheel, is het makkelijker om de koppelingen te testen. Hierdoor weet Cees meteen of dat wat hij gebouwd heeft ook daadwerkelijk functioneert. Hij is trots op de eerste koppeling die binnenkort in productie gaat.
Cees zou Caesar Experts omschrijven als een professionele organisatie, waar een groot saamhorigheidsgevoel heerst. Hij is zelf dan ook altijd bereikbaar voor vragen van andere Experts. Met zijn backend expertise op het Java vlak, kan hij iedere collega goed op weg helpen.
“Als je bij Caesar Experts wilt werken, is het belangrijk dat je goed meedenkt met de klant en een professionele instelling hebt. En natuurlijk willen we dat je de nodige kennis in huis hebt, bijvoorbeeld Java 8. Je hoeft niet overal Expert in te zijn, maar je weet wel welke frontend technieken er zijn en wat ze doen. Een Expert bij Caesar heeft zich in ieder geval ingelezen!”
Onze twee stagiairs, Christian en Achraf, zijn allebei net afgestudeerd na een bijzondere stage bij Caesar Experts. Want wat begon als een gewone eindstage werd door corona een onvergetelijke tijd. Hoe is het hen bevallen en hoe pak je de draad weer op als je midden in je stageperiode ineens thuis aan de slag moet? We spraken de mannen over hun ervaring bij Caesar Experts.
Christian kwam de Caesar Groep tegen tijdens de stagemarkt: “Ik had allerlei papieren bij me en Caesar was de enige die een map had waar ik alles makkelijk in kon meenemen. Daarin zat ook het waardenboekje en de stageopdrachten die open stonden bij Caesar. Na een gesprek met Marit en Niels had ik een goed gevoel dus ik besloot er voor te gaan.”
Ook Achraf was meteen enthousiast: “De eerste indruk die ik kreeg was positief. Nu mijn stage erop zit kan ik dat alleen nog maar verder bevestigen. Caesar geeft stagiaires de kans om zich te kunnen ontplooien, ondanks dat ze zelf geen software ontwikkelen.”
Teamavond
Net na de start van hun stage vond de teamavond van Caesar Experts plaats, uiteraard werden de stagiairs daar ook voor uitgenodigd. Achraf: “We gingen met elkaar eten en bowlen, dat was heel gezellig en zo leerde ik iedereen snel kennen”. Christian: “De mix tussen serieus bezig zijn met je opdracht en af en toe gewoon even lol hebben met elkaar is heel fijn bij Experts. Als ik niet verder kwam met mijn verhaal zeiden ze bijvoorbeeld dat ik even lekker naar buiten moest gaan om een rondje te lopen. Daardoor raakt je hoofd leeg en werk je daarna veel relaxter verder aan je scriptie.”
Lockdown
En toen kwam de lockdown en moesten de mannen thuis werken. Christian: “Ja, dat was soms wel even schakelen, hoewel ik thuis een goede werkplek heb, was ik wel sneller afgeleid. Mijn stagebegeleider had door het coronavirus meer werk vanuit zijn opdrachtgever, maar er was altijd wel iemand die tussen de bedrijven door tijd had om mijn vragen te beantwoorden. Daar was ik heel blij mee.”
Achraf vult aan: “Ik woon nog thuis dus het was wel druk met twee jongere broertjes. Zodra het mocht ben ik weer naar kantoor gegaan omdat ik daar beter meters kon maken. Het overleg met mijn begeleider ging via Teams, ik merkte dat ik het soms lastig vond om hem te storen tijdens zijn werk, maar net als bij Christian was er altijd wel iemand die me verder kon helpen.”
Al met al was de stage van Achraf en Christian dus samen te vatten als een heuse rollercoaster. Maar beiden zijn ze – ondanks de loopings en de vrije val – geslaagd met een ruim voldoende en daar zijn wij als Caesar Experts hartstikke trots op.
Ook stagelopen bij Caesar Experts? Neem contact op met Marit Oude Engberink via recruitment@caesar.nl
Both Camel and NiFi are Apache projects. Their code is mostly written in Java and both are targeting data processing and integration. However, there are also many differences. One difference is that NiFi is a platform and Camel a framework.
For NiFi it means that it’s a software solution where you centrally build dataflows. The concept of dataflows let you take multiple processors to process data. Together processors form a dataflow. NiFi has around 200 processors, most of which are built-in.
Camel is mostly used at a code level. On the top of the framework companies have build platforms like for example Talend ESB or Red Hat Fuse. However, you can just as easily use it in your own application code or build an API, an integration or a microservice.
Camel supports all kind of integration patterns and components. A developer can take the core-engine of the framework and can add more than 300 components to it. The components and patterns together form a route.
Combining superpowers
Both projects provide a lot of powerful concepts, patterns and processors. Between the 200 processors and 300 components there is a quite some overlap. Still, no software in the world support all libraries, protocols and technologies. What if these superpowers could be combined?
There is currently no NiFi component in Camel and no Camel processor in NiFi. The difficulty is that both have implemented lots of protocols, but they don’t provide one for external parties. It’s like having a gasoline and an electric engine. They can work together in all kind of hybrid ways, but it’s not easy to combine them.
The example
Let’s explore a hybrid solution for NiFi and Camel. As an example we use a very simple, hello world-like, use case:
Moving files between directories.
As source directory we use C:\in and as destination C:\out
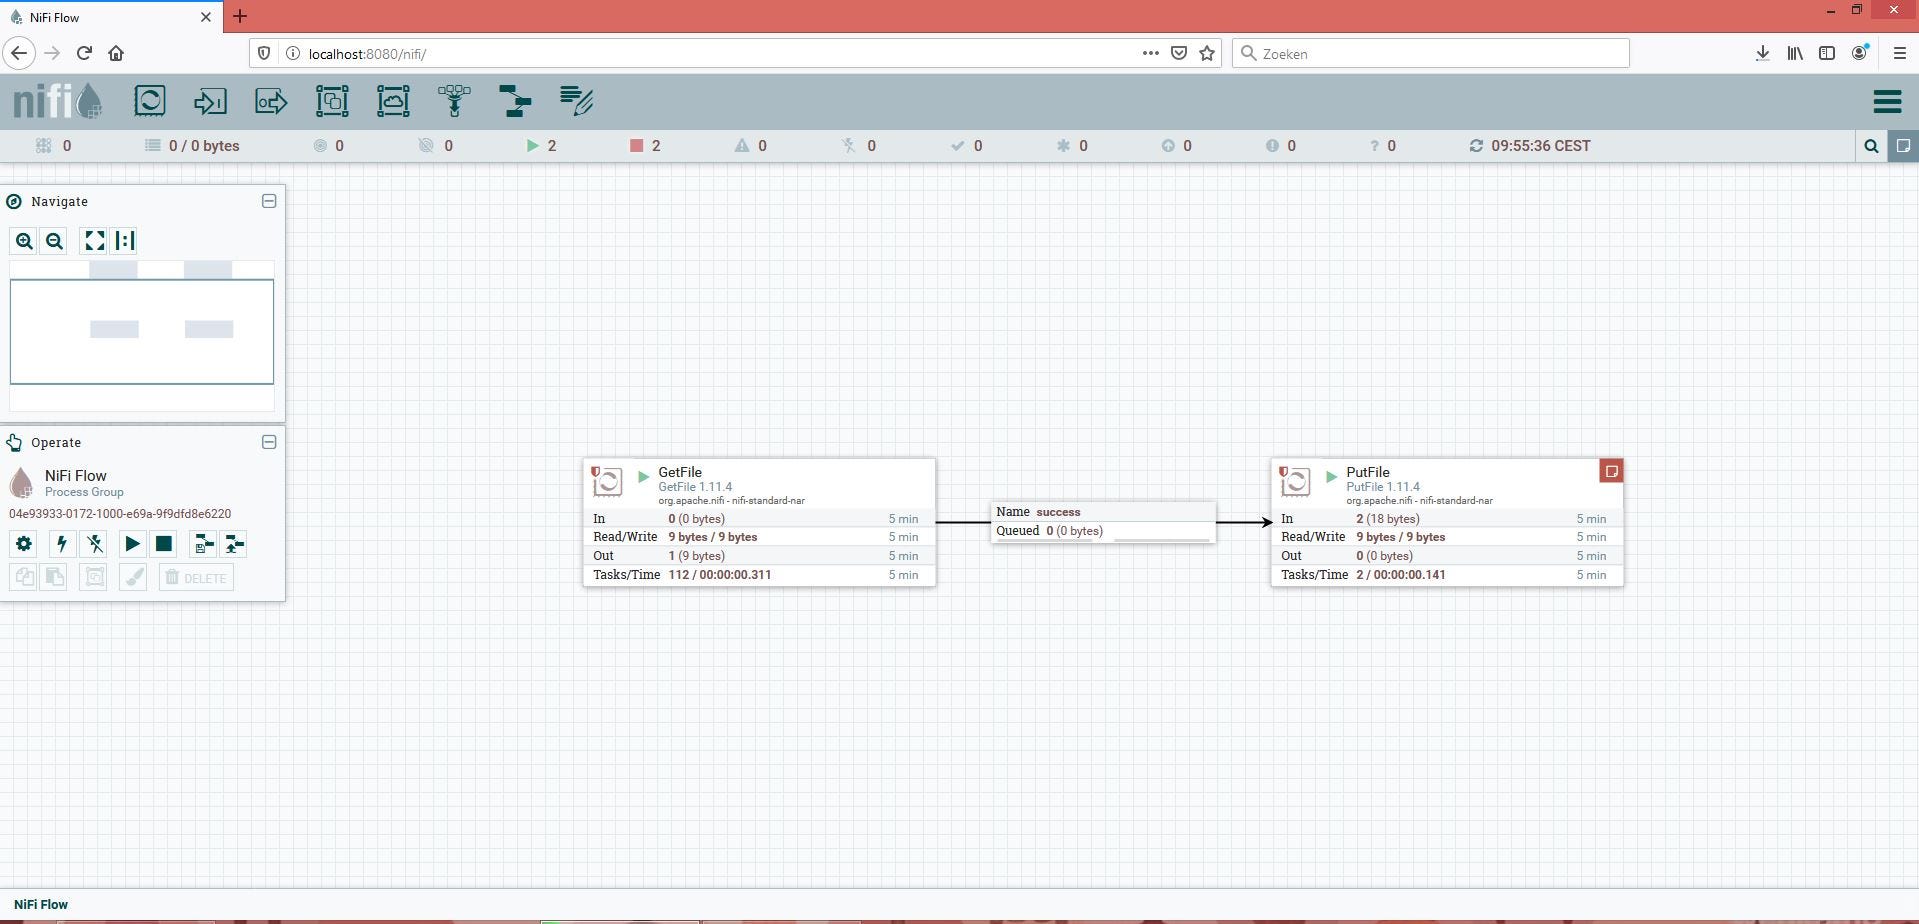
How would one create a pure NiFi solution? Well, just use the GetFile and PutFile processor:
And how would this work in Camel? This can be done by using the Camel DSL:
from(file://C:/in).to(file://C:/out);
Both provide a simple and sufficient solution. Nobody would complicate things by using multiple technologies. But to keep things simple this is exactly what we will do 🙂
Keep in mind that there are many more complex situations where it makes sense to use both. We’ll come back to that later. First we will create a demo to combine Camel and NiFi in one solution. We do this on a software (tooling) and a code level.
One solution on software level
We’ll continue with our simple example of moving files between two directories. To investigate a solution on a software level we shall not code. Only software components are being used.
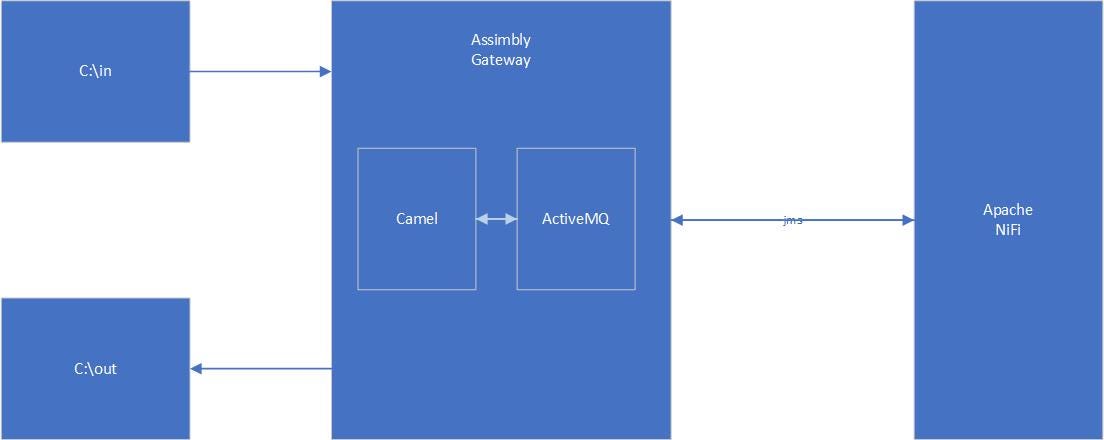
In NiFi the normal approach is creating flow with the user interface. As we don’t want to code our Camel Route too, we use Assimbly Gateway to configure the route in a browser. Assimbly allows to create connections with Camel and ActiveMQ.
Next step is to find a matching protocol to connect both technologies. A good candidate is to use JMS. Both are well-supported by both Camel and NiFi. Here is the combined flow:
Let’s check the JMS example in more detail.
Camel
The Camel route running in Assimbly picks up a file from C:\in and puts it as a message on the JMS Queue “in” on ActiveMQ (also running in Assimbly).
You can find out how to run this Assimbly flow with Camel and ActiveMQ on the Assimbly wiki. There is a quick-start and also a tuturial on message queueing.
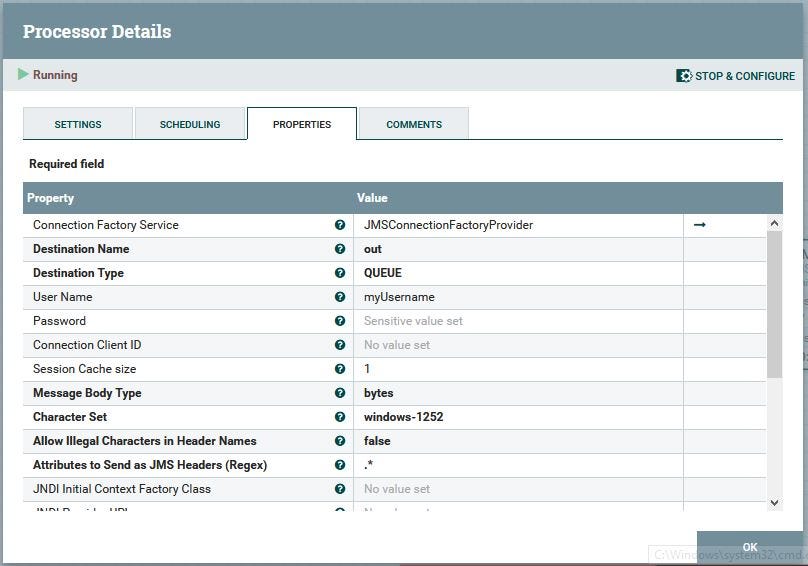
2. NiFi
Apache NiFi gets the message from the queue ‘in’ with the ConsumeJMS processor and publishes it on queue ‘out’ with PublishJMS processor.
To accomplish this, we first create a controller service for JMS:
The ActiveMQ Artemis client library (JMS Client Libraries) is downloaded directly from Maven.
Next step is to configure the ConsumeJMS processor:
And the PublishJMS processor:
Last, but not least, we start the flow:
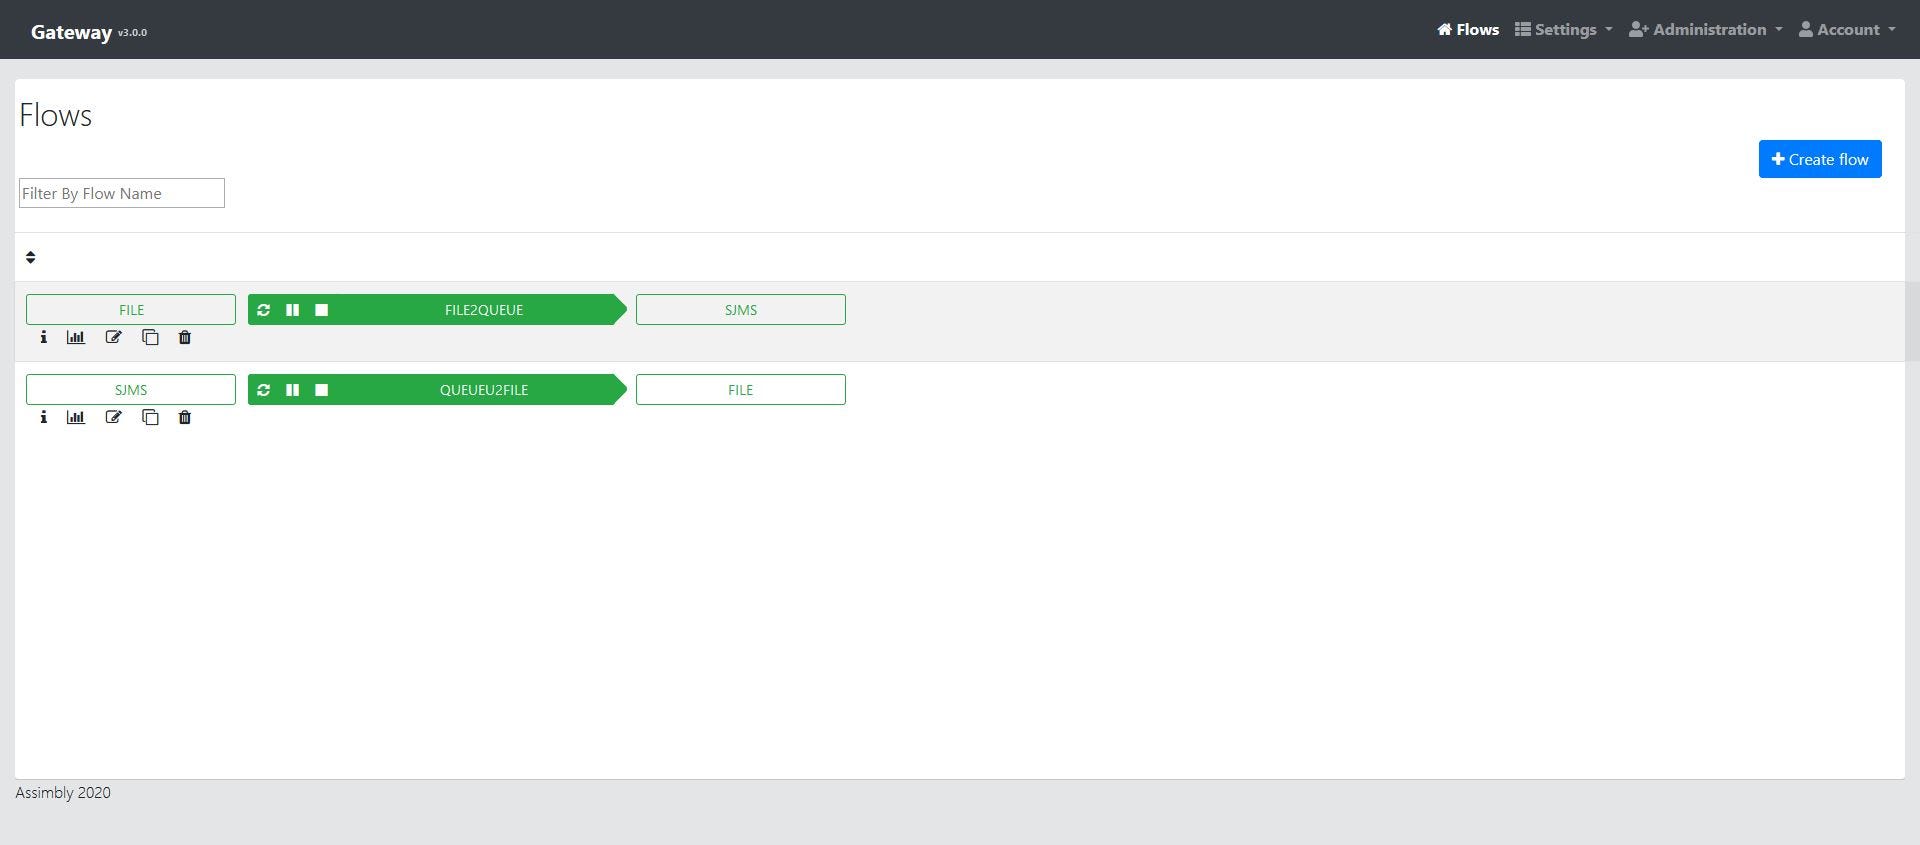
3. Camel
Another Assimbly flow let Camel consumes the file from the queue ‘out’ and saves it into the directory C:\out. For this flow we clone the first flow and configure it in reverse:
When testing the flow it still functions the same way as NiFi or Camel did on their own, but now combined in one solution.
More complex stuff
You can choose this setup in more complex situations because of:
Separation of Concerns: let NiFi run flow logic and Camel run the connections (without the need of applications doing a lot of integration).
Let NiFi work centrally and Camel distributed.
Enhances functionality: NiFi processors and Camel’s components.
Have a clear transport layer (MQ).
It’s possible that completely different teams or engineers work on either of those tools.
Other options
Our example used JMS, it’s of course possible to use other protocols. For example let Camel post a message with the HTTP component and let the “HandleHttpRequest” processor of NiFi handle this request. Then NiFi posts the message with the invokeHttp processor to the “Jetty component” hosted by Camel that saves the message to file.
There are many other possibilities to use both NiFi and Camel (through Assimbly Gateway) together. For example use Apache Kafka broker with topics as broker instead of ActiveMQ. Or to use their REST interfaces. The key point to take is that here you can have separate-of-concerns and this setup support all kinds of use cases.
One solution on code level
Like Camel, NiFi can be extended with Java code. This is done by creating a custom processor or service controller. There has been some discussion in the NiFi community to use Camel code within NiFi processors. This is reflected in the Jira issues:
This has not been materialized yet and there is not a lot of code to find on this topic. Therefore, I created two experimental custom NiFi processors which combines NiFi and Camel code.
How do they work?
As a first step we create a custom NiFi processor. There is an excellent guide for this written by Shubam Gupta. This takes a maven archetype to generate a default custom processor.
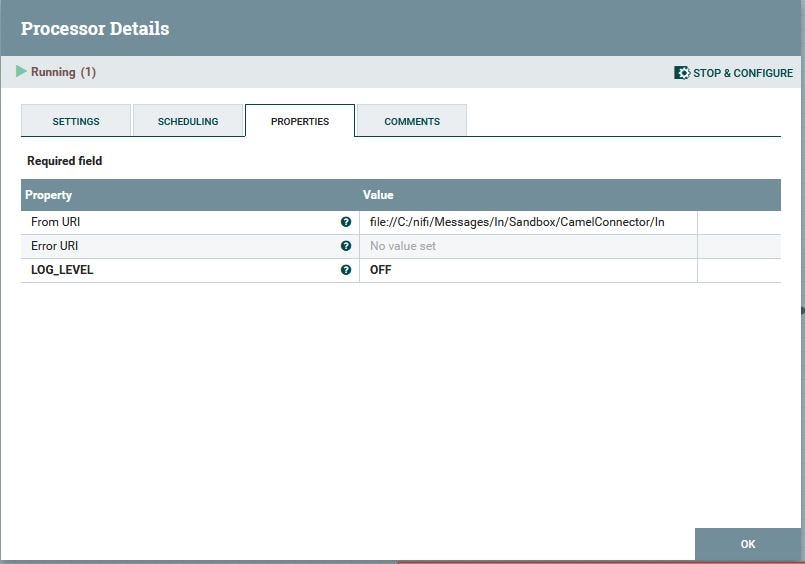
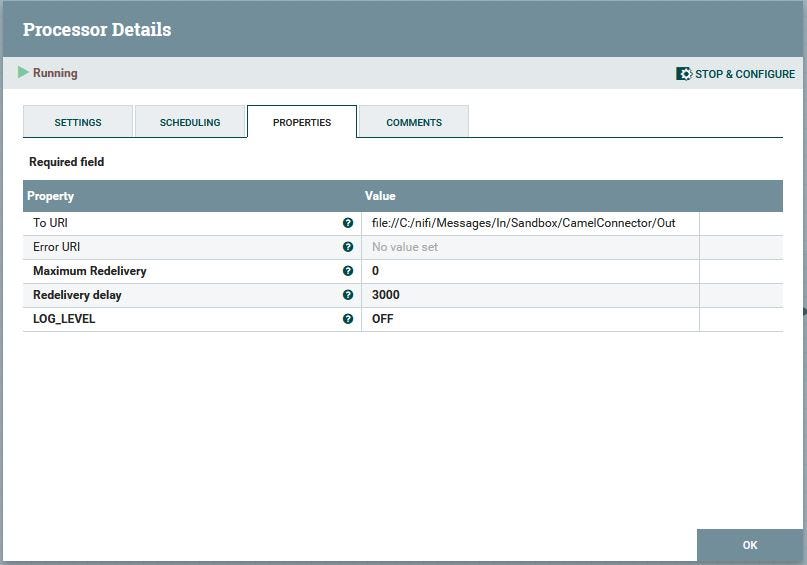
With this guide we create a new ‘ConsumeWithCamel’ processor. We add the following properties:
From URI (the URI of the Camel component for consuming)
Error URI (The URI of the Camel component for errors)
LogLevel (The loglevel to the NiFi log of the Camel component).
Then we add the Camel code that:
Starts a CamelContext
Configures the route
Creates a consumer template
We let Assimbly Connector handle the Camel code. This API is used in Assimbly Gateway as well. It uses a convention over configuration approach and already has a lot of Camel components (like the File component) built-in.
Here is the code used when starting the NiFi processor:
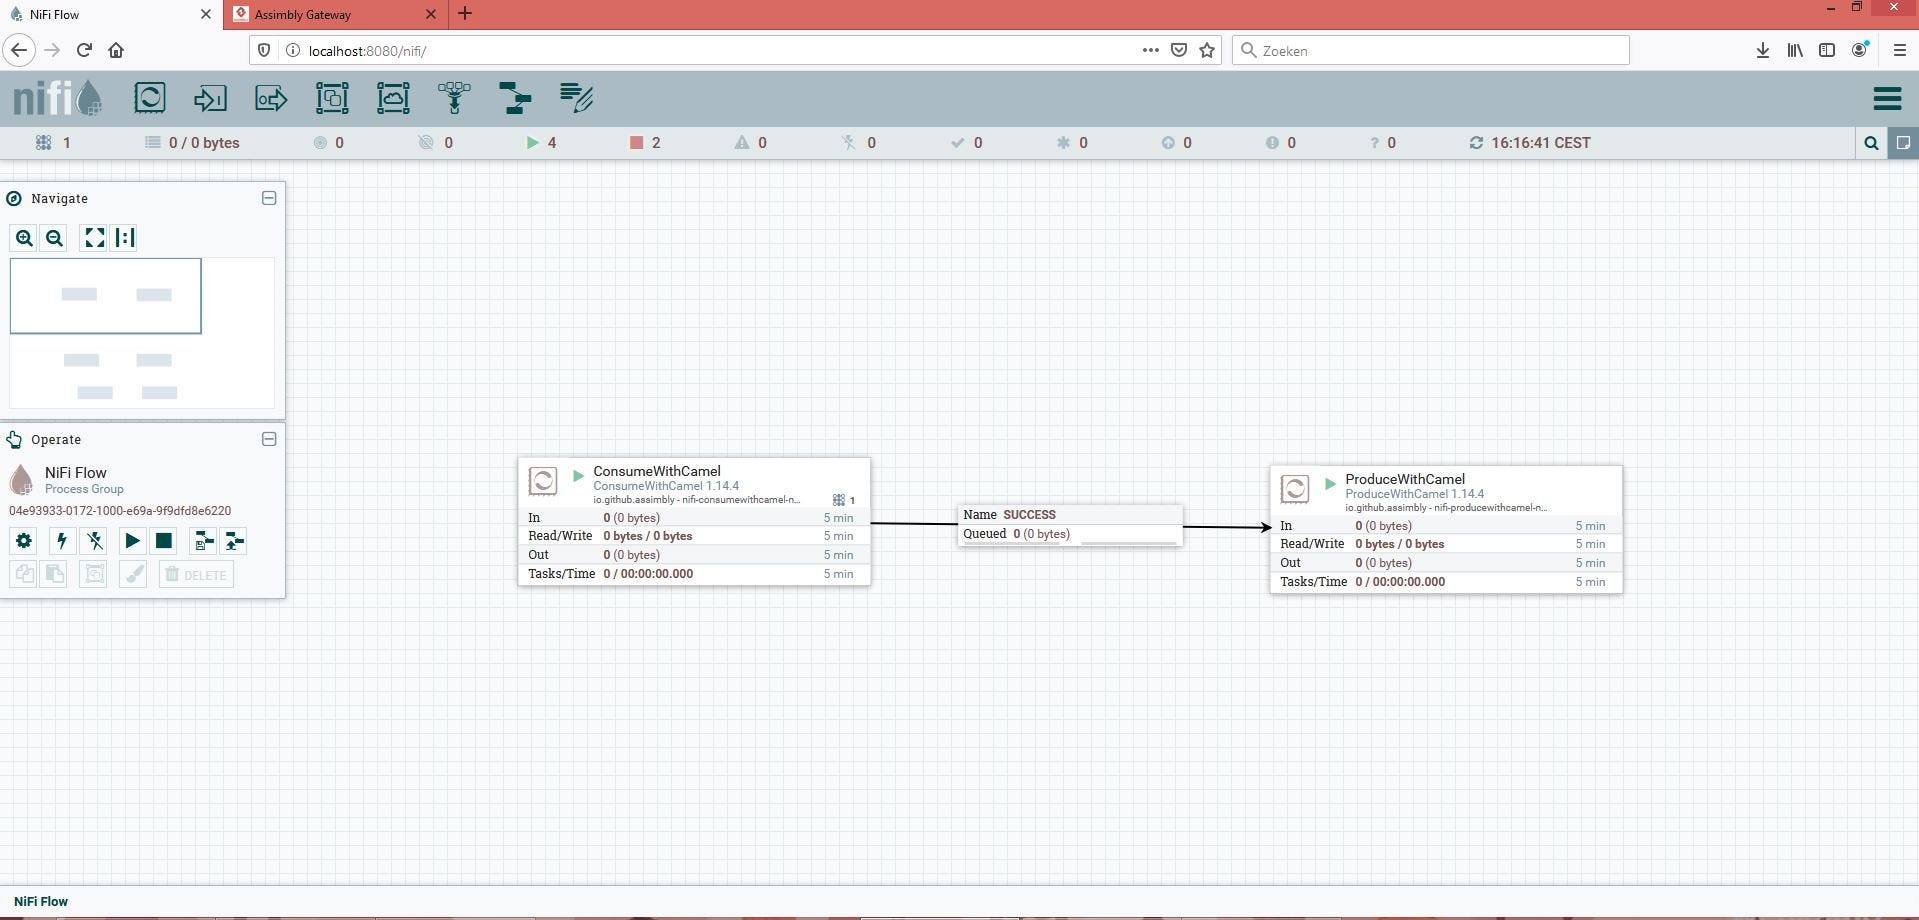
Next we create another custom Nifi Processor: “ProduceWithCamel”. This is similar to the consume processor, but it works in the reverse direction. For this we’ll use a producerTemplate to produce the messages. The code for this processor you can find here.
Note: These are experimental processors created only for this demo.
Testing the code
To test the code you can download the ConsumeWithCamel processor and also the ProduceWithCamel processor. Both NAR files are put into the lib directory of NiFi.
Now we can use the new Consume processor and configure it:
The Error URI is empty, which mean errors will be logged to the NiFi log file.
Secondly we configure the produce processor:
Finally we connect both processors with each other and start the flow.
The file will be picked up and stored just like in all other examples.
More possibilities
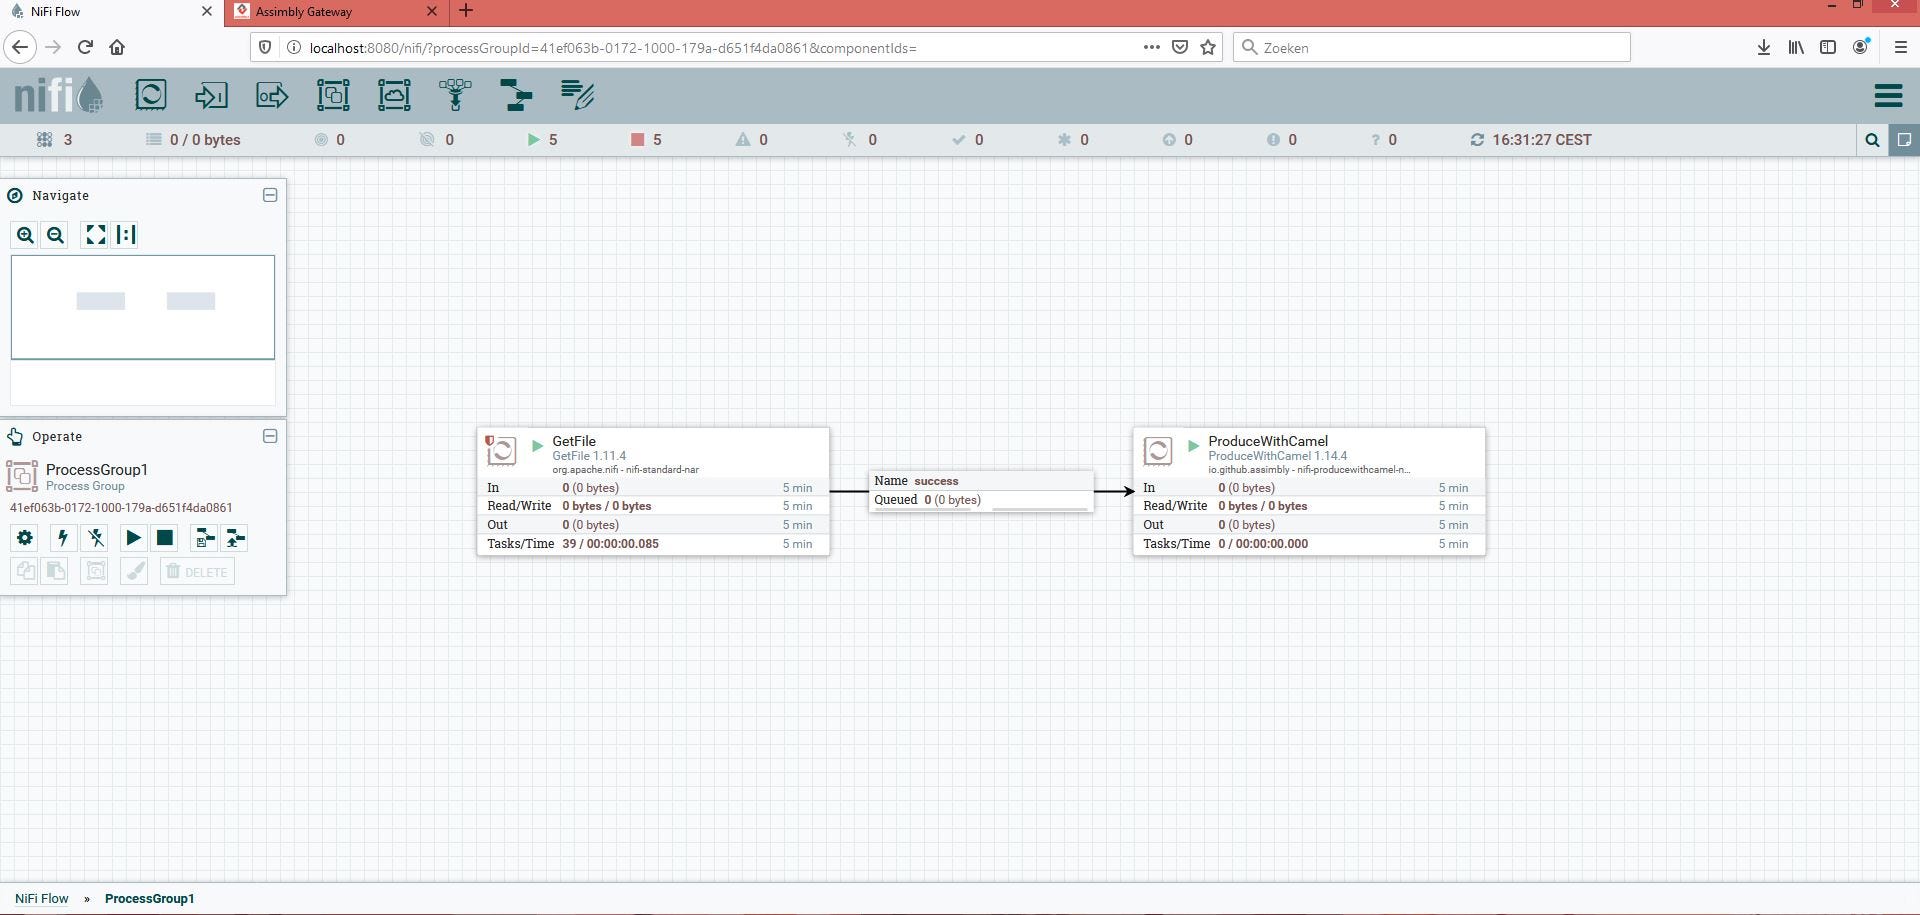
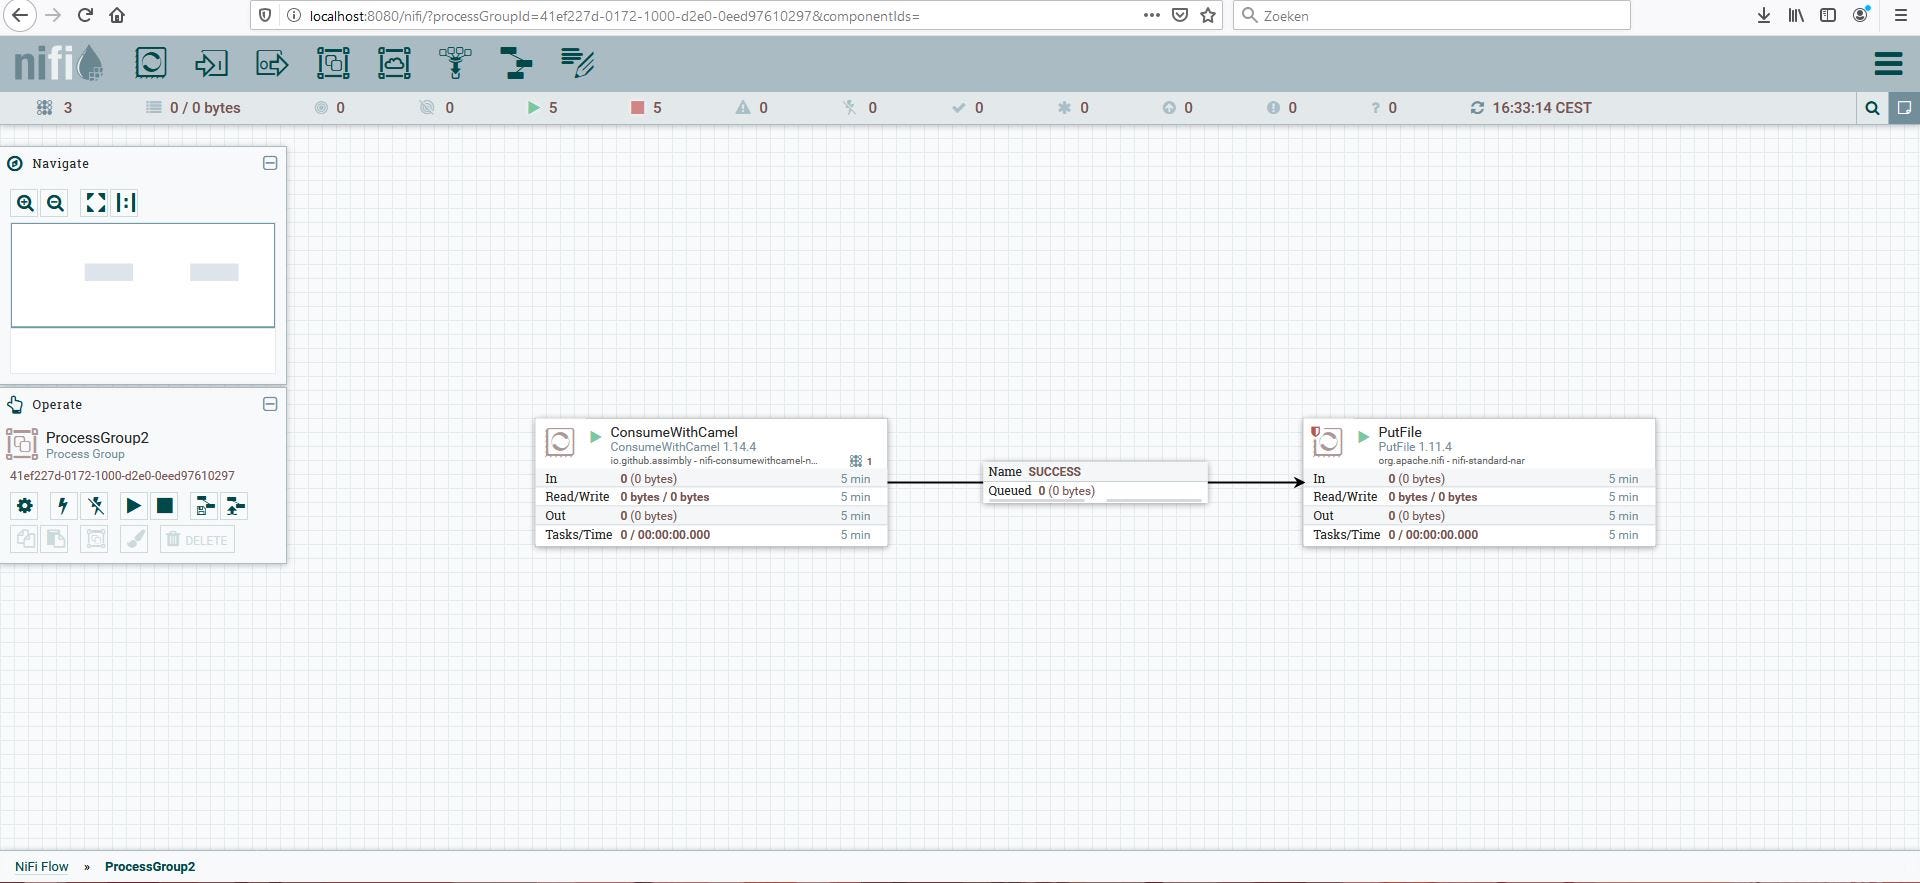
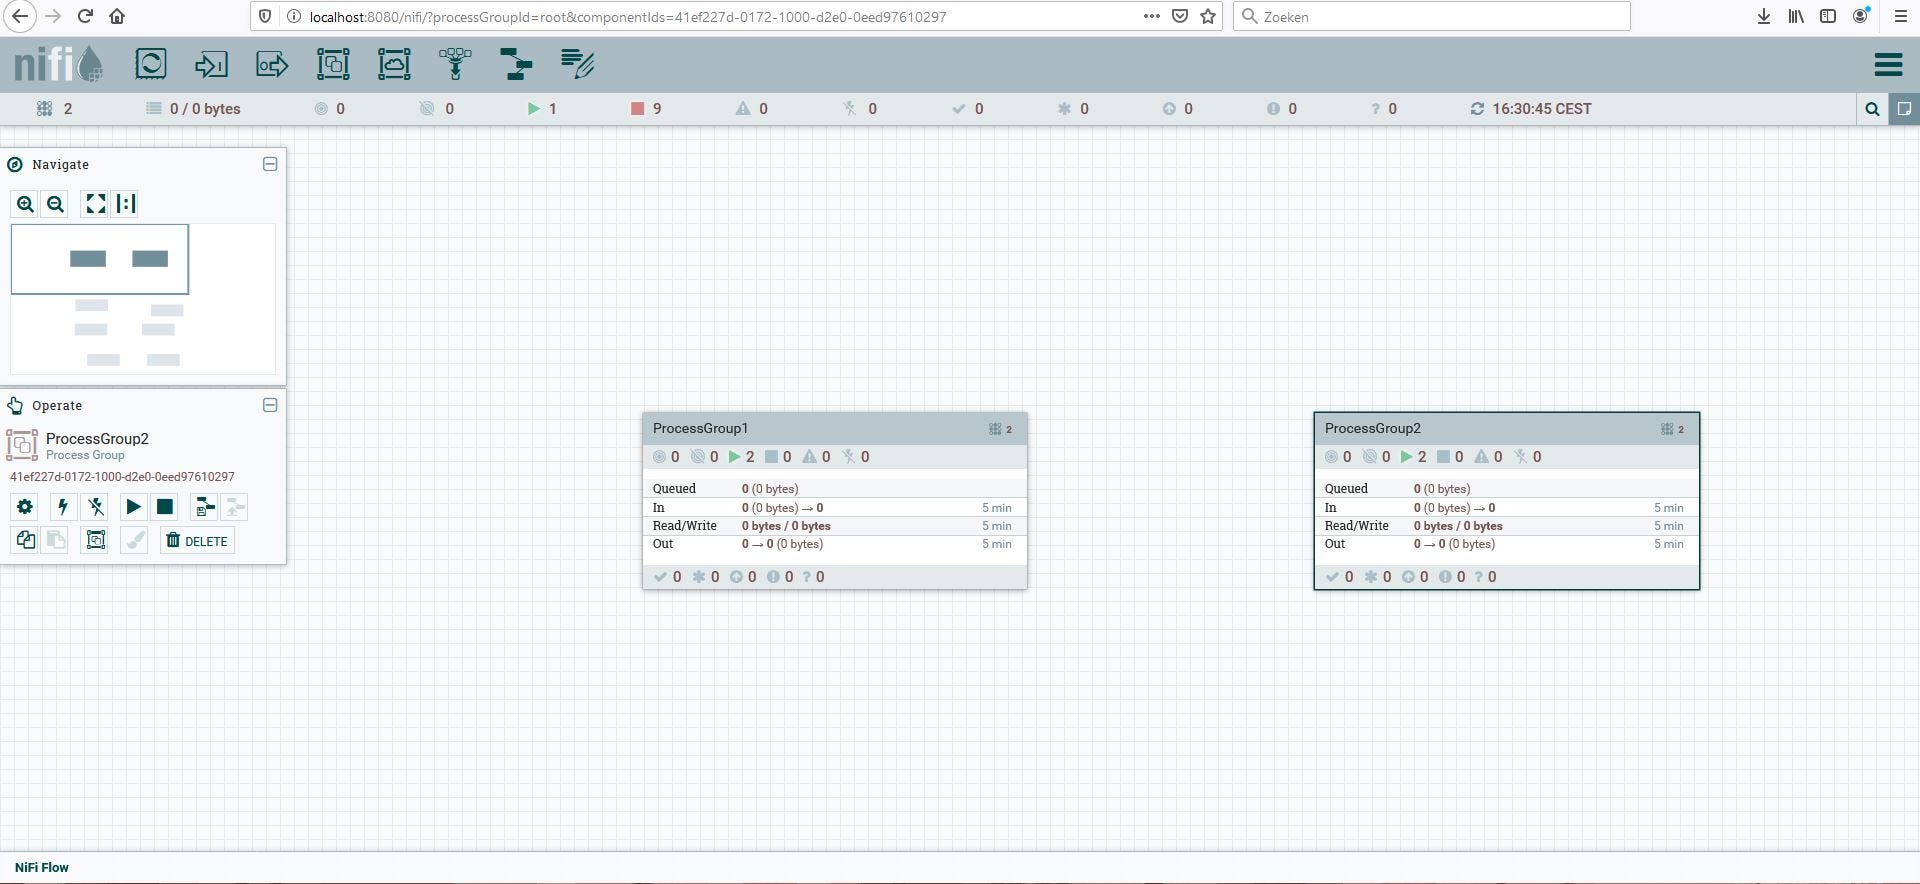
Just like using tools, the code solution also creates all kinds of possibilities. For example dataflows aren’t loosely coupled. So you always need to connect processors or process groups. When creating two process groups now you loosely couple with Camels’ VM component.
The first process group uses the producewithcamel with the URI vm://secondProcessGroup
The second process group consumes this message:
Now both flows move the file from one directory to another, but the process groups aren’t connected as usual. The new solution acts like a ‘wormhole’.
Though every example had the same result, there were many paths. Within integration it’s good to use open source as well as an open mind. Together they’re unstoppable on whatever path you are on.
Syntergration bracht een half jaar geleden Assimbly Gateway 1.0 uit. Een generic application die andere applicaties met elkaar verbindt en data deelt. Sindsdien is er veel gebeurd. We zetten de belangrijkste veranderingen voor je op een rijtje.
Camel
De motor achter Assimbly is Apache Camel, een open source Java-framewerk dat moeiteloos verschillende applicaties, protocollen en berichtformats met elkaar integreert. Binnen Assimbly hebben we Apache Camel geüpdatet naar versie 2.22.4. Ook Apache ActiveMQ is geüpdatet, naar versie 5.15.9. Dat betekent dat we de mogelijkheden van Assimbly behoorlijk hebben vergroot. We ondersteunen nu de volgende Camel-componenten:
AMQP
AS2
CXF
ElasticSearch
Jetty
RabbitMQ
Slack
Websocket
Webapplicatie
Onze Assimbly-webapplicatie heeft ook een aantal belangrijke veranderingen doorgemaakt. Zo zijn we overgestapt op JHipster versie 5.7.2. Samen met de update van JHipster haalden we ook de nieuwste versies van Angular en Spring Boot binnen. De Assimbly-webapplicatie biedt nu ook support voor HTTPS/TLS-certificaten. Je vindt er meer informatie over op onze wiki.
Naast deze belangrijke updates hebben we ook behoorlijk wat kleine veranderingen doorgevoerd:
Ondersteuning voor Simple Expression Language
Ondersteuning voor MS SQLServer en Oracle DB
Ondersteuning voor byteberichten als output
MaximumRedeliveries en redeliveryDelay zijn vanaf nu configureerbaar
Rebase naar DocConverter
Camel-opties zijn nu te selecteren uit een alfabetische lijst (maar custom opties blijven toegestaan)
Verbeterde error handling
De complete release notes en alle downloadlinks vind je hier terug.